for those who love the outdoors
31 March, 2022
Being able to create fire by friction is a fundamental skill in bushcraft. Here's how to make your own.
Not only is it a fire lighting method that has been used for thousands of years but is a technique that could save your life out in a survival situation. Making a bow drill set can seem daunting to some but there are some tips to make it a bit easier for yourself. So let’s take a look at how to make a bow drill set.
The bow drill set is made up from the following parts each with its specific job-
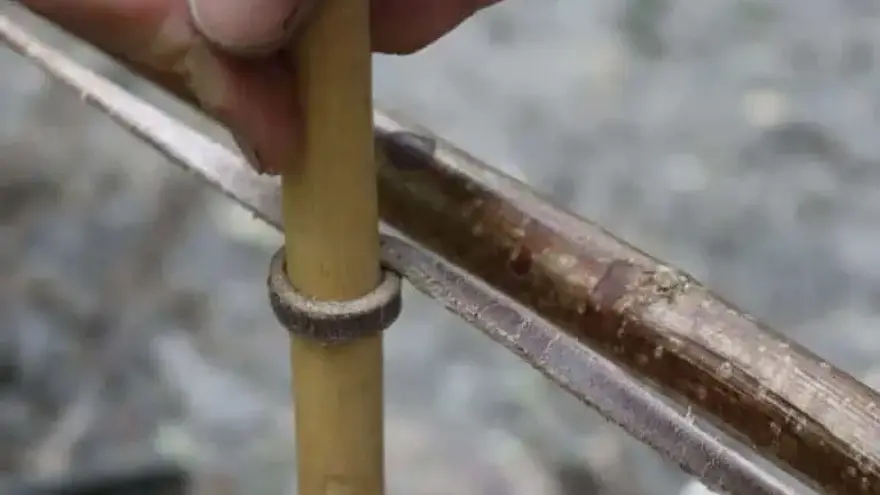
This should be about the same length as half of your arm span, though some prefer it slightly shorter. It can be made of any dry wood but needs to be slightly curved. Attach a piece of paracord tying it off to both ends of the bow. The cord shouldn’t be as tight as a guitar string but needs to be relatively taught.
This is the upright section of the bow drill set and is in contact with the bearing block at the top for stability and pressure, and the hearth board at the bottom where the friction and heat production takes place.
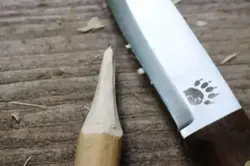
To make the drill you need to select a straight piece of dry wood, Hazel, Sycamore, Ivy and Willow are all great wood choices for this.
Start by bevelling and rounding one end of the drill, this is the end that will work with the hearth board at the base. On the other end carve a taper, slightly like an Eiffel Tower shape, so you can minimise the friction caused at the top of the drill in contact with your bearing block. By making the contact point at the top of your drill smaller than the bottom one you will reduce the chance of creating heat at the wrong end of your bow drill set.
This is the section of the bow drill set that stabilises the drill at the top and enables you to provide downward pressure. This can be made from anything from a block of wood, seashell or antler. It needs to be a strong enough material to take the downward pressure but also needs to be slightly curved or have a small cup like shape carved in to stabilise the top of the drill.
This is the base of the bow drill set which sits on the ground to not only provide the stable platform but is the other point of friction along with the base of the drill. This is also where the wood dust collects as the result of the friction along with the heat which will combine to create the ember.
Sycamore, Ivy, Willow, Alder and Cedar are all great wood choices for making the hearth board. The board needs to be about 5cm wide and long enough that you can make it stable with your foot.
A small bowl like indentation needs to be made for the drill base to fit in to create the point of friction so it’s important that it fits well to maximise area of contact. To make this, push the tip of your knife in to the wood and twist the knife in a drill-like action to form the indentation.
Next, to improve the fit of the drill in to the hearth board you need to load your bow with your drill, so the drill is running on the outside of the string. Place the bearing block at the top and put the base of the drill in to the hearth board indentation.
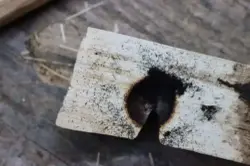
Now start to use your bow back and forth to help to bed in the base of the drill in to hearth board creating a better fit. Once you reach a point that they fit together nicely, and you’ve probably created smoke by this point, you now need to cut a V-shape in to the circular indentation of the hearth board. Cut out a small pizza slice shape piece that should take out a small section of the indentation with it too. This allows the hot wood dust to collect in one place to help focus the heat and fuel together, which will then become your ember. It is a good idea to place a piece of bark or wood under the hearth board to make it easier to collect the ember once you get it.
Now all you need to do is get practicing, remember to be patient, this rarely works first time and takes some effort and determination to get it, so be persistent.
Article kindly provided by our pals at Wildway Bushcraft Click here to learn more about their courses and activities.

Outside & Active is the home for those who love the outdoors. Our mission is to inspire, inform and educate people about being active outdoors in a fun, safe and sustainable way. We provide inspiration, kit, tech and advice on adventure, camping, climbing, cycling, hiking, running water and winter.
Most recent articles by Outside & Active
Most recent articles in CAMPING